
OpenSSH in Windows
Nowadays OpenSSH is shipped with most Windows client devices. What makes the OpenSSH solution the most convenient for connecting to Intel DevCloud from a Windows machine is the fact that it requires the least number of third party components to be downloaded and installed.
For more information on how to install/enable OpenSSH on your Windows machine, please check this documentation page.
Once OpenSSH is installed you can move to the step of configuring the SSH connection to Intel DevCloud.
WARNING: Before proceeding, please check with your IT department what are the PROXY_SERVER:PORT settings for your organization. The remote connection to Intel DevCloud will fail without this information. You can ignore this warning if you're connecting to the internet directly without a proxy.
Dependencies
No dependencies are required if you are connected directly to the internet. However, if your Internet service provider or organization requires SSH connections to pass through a proxy server, one additional third party component is required.
The instructions below use the ncat networking utility from Nmap. Precompiled binaries are available as a zip download, thus no installation is required. Simply unzip to the desired location.
As an alternative to the ncat utility you can use instead connect.exe that is installed by Git for Windows.
Warning: Use at your own risk! As with all third party components we make no claims about the security of this product.
SSH Connection Configuration
-
Download the DevCloud SSH access key to your user SSH directory on
your local computer
* Sign In to see the download link. You can, for example, download to a temporary location and then move the file into place. This SSH directory is located at %userprofile%\.ssh
Note: The equivalent path on Linux is ~/.ssh/. -
Switch to your user SSH directory:
cd %userprofile%\.ssh -
Create a text file called config without the .txt extension and add
the following lines to it:
Note: If you have multiple accounts on the Intel DevCloud, you can change the hostname devcloud to any other identifier to differentiate between your accounts. This is the hostname that you will use for the ssh, scp and rsync commands.Host devcloud User <user> IdentityFile ~/.ssh/devcloud-access-key-lt;user>.txt ProxyCommand ssh -T -i ~/.ssh/devcloud-access-key-lt;user>.txt guest@ssh.devcloud.intel.com -
Configure proxy settings.
In the interest of security, some networks route all traffic through
a proxy server. If you followed the instructions above but are
getting the error "Connection timed out", you are likely on such a
network. In order to connect to the Intel DevCloud you need to append
these additional settings to your %userprofile%\.ssh\config file:
Note: PROXY_SERVER and PORT are usually provided to you by your IT department.Host devcloudx User <user> Port 4022 IdentityFile ~/.ssh/devcloud-access-key-lt;user>.txt ProxyCommand ssh -T devcloud-via-proxy Host devcloud-via-proxy User guest Hostname ssh.devcloud.intel.com IdentityFile ~/.ssh/devcloud-access-key-lt;user>.txt LocalForward 4022 c009:22 ProxyCommand <path_to_ncat_exe> --proxy PROXY_SERVER:PORT --proxy-type socks5 %h %p
Configuration for Using Remote Tools
Additional settings are required in order to enable remote access over SSH using tools such as Microsoft Visual Studio Code*. Copy-paste the following into your %userprofile%\.ssh\config file and update the user specific information.
# DevCloud VSCode config:
Host devcloud-vscode
UserKnownHostsFile /dev/null
StrictHostKeyChecking no
Hostname localhost
User <user>
Port 5022
IdentityFile ~/.ssh/devcloud-access-key-lt;user>.txt

#SSH Tunnel config:
Host *.aidevcloud
User <user>
IdentityFile ~/.ssh/devcloud-access-key-lt;user>.txt

# uncomment to enable the tunnel over the direct line
#ProxyCommand ssh -T devcloud nc %h %p

# uncomment to enable the tunnel over the proxy line
#ProxyCommand ssh -T devcloudx nc %h %p

LocalForward 5022 localhost:22
LocalForward 5901 localhost:5901
Windows Terminal
OpenSSH and Windows Terminal make a powerful combination on Windows. Windows Terminal allows, through custom or third party profiles, to establish a connection to Intel DevCloud with a simple click of a button.
For information on how to install Windows Terminal please follow the official documentation.
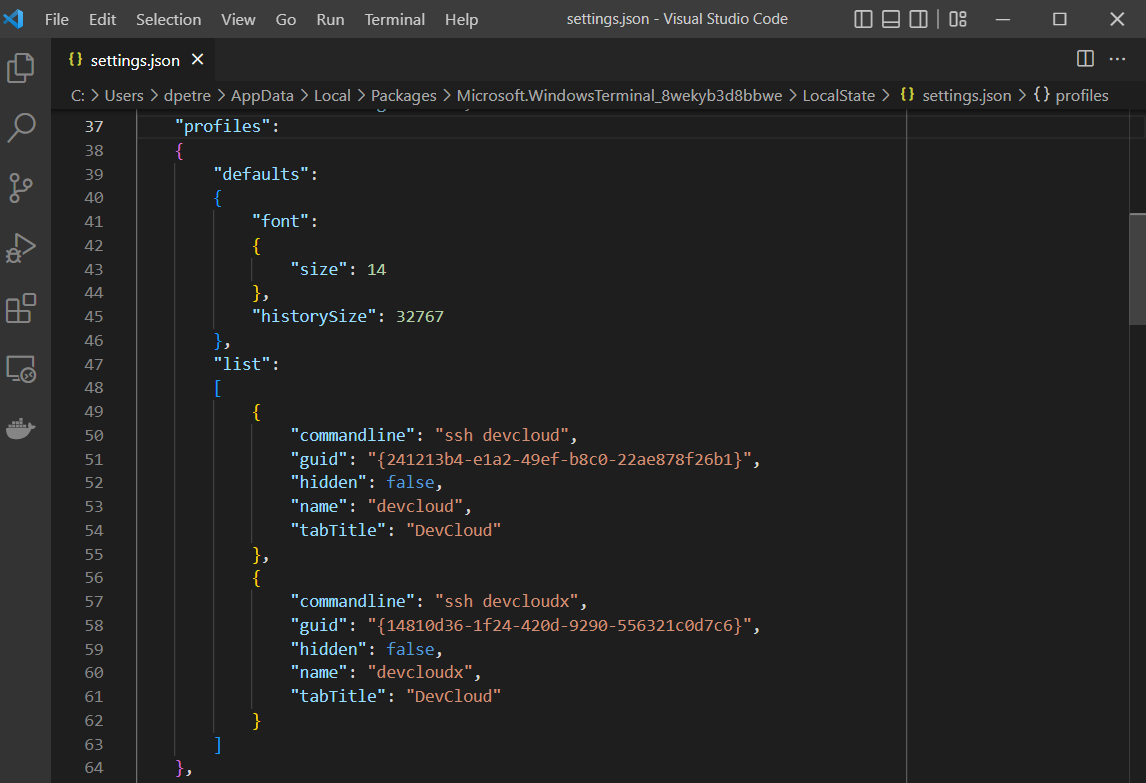 The image shows Windows Terminal settings.json file open in
Visual Studio Code and two custom profiles for connecting to Intel DevCloud.
The image shows Windows Terminal settings.json file open in
Visual Studio Code and two custom profiles for connecting to Intel DevCloud.
After opening the settings.json file, you can copy paste the following two JSON fragments in order to create the devcloud and devcloudx profiles. You can change the guid to any GUID value.
Configuration of the direct SSH connection to Intel DevCloud (devcloud):
{
    "commandline": "ssh devcloud",
    "guid": "{241213b4-e1a2-49ef-b8c0-22ae878f26b1}",
    "hidden": false,
    "name": "devcloud",
    "tabTitle": "DevCloud"
}
Configuration of the SSH connection to Intel DevCloud through a proxy server (devcloudx).
{
    "commandline": "ssh devcloudx",
    "guid": "{14810d36-1f24-420d-9290-556321c0d7c6}",
    "hidden": false,
    "name": "devcloudx",
    "tabTitle": "DevCloud"
}
The new profiles are available immediately after saving. You can establish a connection to the DevCloud by clicking on either one or by using the keyboard shortcuts provided on the right of each menu item. The devcloudx profile will only work if your local machine is connected to the internet trough a proxy server. The devcloud profile will establish a connection when your local machine is directly connected to the internet.
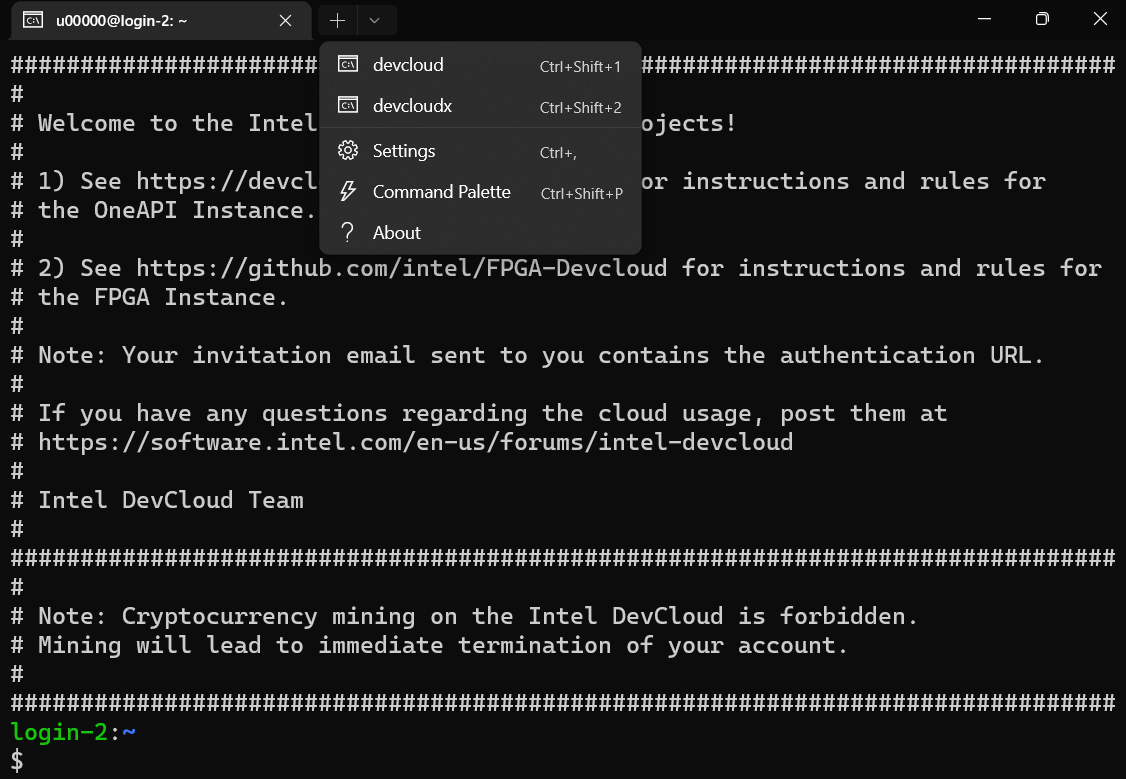
The image shows Windows Terminal profiles for the direct SSH connection to Intel DevCloud (devcloud) and for the SSH connection to Intel DevCloud through a proxy server (devcloudx).
* Visual Studio Code, Microsoft, Windows, the Windows logo are trademarks, or registered trademarks of Microsoft Corporation in the United States and/or other countries.